• Skip to primary navigation
  • Skip to main content
  • Skip to primary sidebar
  • Skip to footer

Vish's Kitchen

  • About
  • Home

Vish

Awadhi Lamb Biryani

December 11, 2020 by Vish Leave a Comment

The 2 most popular regions in India where Biryani comes from is Lucknow in the northern state of Uttar Pradesh and Hyderabad which is located in the Southern state of Telangana.

The Awadhi Biryani we will make is one from Lucknow in the north also called Lucknowi biryani.

What is Awadhi Biryani?

Awadhi Biryani which is considered one of the most elegant and lavish dishes of the Nawabs of Awadh, who were originally of Persian origin. Awadh used to be one of the many provinces in the north India that was under the rule of the Mughal empire.  This region now referred to as Lucknow and the dish is quite often also called Lucknowi Biryani 

Traditionally biryani is cooked over coal in a sealed clay pot. The pot is sealed using a dough seal. Flour and water are mixed to form a dough that is pliable enough to wrap around the lid and it forms a tight seal. The pot is left sealed through the whole cooking process. This method of cooking where the clay pot layered meat and rice is cooked for hours is called “Dum”. If you see Dum Biryani mentioned in the menu, it refers to the method used for cooking the biryani. 

The Awadhi Biryani is considered a “Pakki” style biryani where a lamb based stew is made ahead of time then layered with the rest of the components of the biryani. “Pakki” meaning “cooked”, refers to the meat which is cooked first separately, then layered with the rice and cooked again along with the rice. This results in the meat being very tender in the biryani. 

How to make Awadhi Lamb Biryani? 

I promise the process of making biryani is not as hard as it may seem. I will break it down into simple steps for you. This process works really well for me each time I make it. And once you get the hang of it, you can very well make all the other variations too. Basically, we can break the process down to 3 major process steps:

  • First, is making the Base Lamb Stew, which can be done ahead of time (Step 1 below).
  • Cooking the rice and getting the other ingredients ready for assembly (Step 2, Step 3 and Step 4 below).
  • Assembling the Biryani, sealing the pot and then cooking it altogether (Step 5 and Step 6 below).

For the seal, instead of the flour and water paste, I am going to cheat a little by using a couple of layers of aluminum foil along. That with the heavy lid of my Dutch oven does a great job at sealing the pot. . 

Step 1 – Making the Base Lamb Stew

This step can be done the previous day or morning of the biryani dinner night.  You will need  –

  • 2lbs Lamb leg cut up into 1-2 inch chunks
  • 1 tbsp vegetable oil
  • 1 large red onion, sliced
  • 2-3 cardamom pods
  • 2-3 bay leaves
  • 1 cinnamon stick
  • 2 tbsp of grated ginger
  • 6-8 cloves of garlic finely chopped
  • Salt to taste (about 1tsp)
  • 1 tsp cayenne powder
  • ½ tsp turmeric
  • 1 tsp garam masala
  • 1 cup greek yogurt
  • 2 cups Lamb or chicken stock

Method to make the lamb stew:

  1. Heat 1 tbsp. of vegetable oil in a large Dutch oven over medium high heat. 
  2. Once hot, add the sliced onion and cook stirring often until it is golden brown.  You can add 1 to 2 tsp water if it starts to stick or dry up. 
  3. Add the cardamom, bay leaves, cinnamon stick and fry them for about 2-3mins.
  4. Add the cut up lamb chunks to this pot. Turn up the heat and brown it on all sides, stirring often.
  5. Once the lamb is brown, add the ginger and garlic to the pot and sauté for 2-3 mins.
  6. Add the cayenne, turmeric, salt and garam masala
  7. Stir in the yoghurt and cook until you see oil starting to separate, 4-5 mins.
  8. Add the stock and bring it to a simmer. Let it simmer on low heat for about an hour. Alternatively, you may also cover and cook it in the oven at 300F for about 1 to 2 hours. This will make the lamb really tender.
  9. Lamb will be cooked through. 

Step 2- Soaking & Cooking the Rice 

You will need:

  • 2 cups of good quality Basmati Rice
  • 1/2 tsp salt
  • 1tbsp lime juice

Cleaning and soaking the rice is essential to get the rice to cooked to the right texture. To do this,

  1. Put the rice in a large bowl and rinse it with water a few times. To do this gently move the rice around in the water to remove any starch in the grains, this will show up sort of cloudy in the water. Do this at least 2-3 times to make sure to get all of it.
  2. Once done, then soak the rice in a generous amount of water for 30 to 45 minutes.
  3. When the rice is soaking, bring a big pot of water to a boil.
  4. Add the salt and lime juice to the water.
  5. Drain the soaked rice and put into the pot of boiling water, salt and lime juice. 
  6. Boil for 4-5 mins until the rice is almost cooked. You can tell when you pick up a grain of rice and press with your fingers. It should still be firm, but break into pieces. 

Step 3 – Making the Caramelized Onions:

The caramelized onions really are the star of the biryani in my opinion. I wouldn’t have a biryani without these. They not only make the biryani look spectacular, but add a very nice caramelized umami flavor to it.

You will need:

  • 1 really large red onion thinly sliced 
  • ¼ cup oil
  • pinch of salt
  • 1tsp granulated sugar

To make them,

  1. Heat up the oil in a frying pan on medium. Add the onions to the pan and sprinkle with a pinch of salt.
  2. Cook until they start to change color. The onions should caramelize, turn slightly crispy and dark golden brown.
  3. Turn the heat down if they start to change color too fast. If the onions aren’t getting to the deep brown color, sprinkle a 1tsp of sugar to it and that will help caramelize them.
  4. Take it out and drain it on paper towels to remove excess oil. 

Step 4 – Preparing the Saffron water

  1. Saffron releases its flavors well when it’s toasted.
  2. To toast the saffron, heat up a small pan on medium heat until it gets hot. 
  3. Turn off the heat and take the pan off the heat. Add a large pinch of saffron to the pan and toss it around for about 2 mins. Take it out right away if you start to see it turn too dark. 
  4. Let the toasted saffron cool for a few mins. Once cool you can powder the saffron and then add about 2 tbsp of hot water to the powdered saffron and let it bloom. 

Step 5 – Assembling the Biryani

You will need:

  • 2-3 Jalapeno chilies cut into long strips, more if you want more heat.
  • 2 inch fresh ginger cut into fine matchsticks
  • Dozen or so mint leaves, julienned into thin strips
  • 2 tbsp. chopped coriander leaves (optional, not for genetically induced coriander haters)
  • 2tbsp butter
  • 4tbsp of heavy cream
  • Cooked and drained rice (Step 2)
  • Caramelized Onions (Step 3)
  • Saffron Water (Step 4)
  1. If the lamb base has a lot of liquid, take some out and reserve. You can warm this up and use it as a side sauce for the biryani. There should still be a little over a cup with the lamb. This will prevent the base from burning.
  2. On the lamb, first add the crispy fried onions. Sprinkle it evenly over the lamb.
  3. Next sprinkle the julienned mint leaves, julienned chilies, ginger matchsticks and the coriander leaves if using. 
  4. Add the rice on top of this layer.
  5. Warm the butter and cream in a small saucepan until the butter melts. Slowly drizzle this all over the rice. 
  6. Lastly, sprinkle the saffron water over the rice. This will add a bright orange color to the rice and an amazing aroma when you open the pot after it is out of the oven.

Step 6 – Cooking the Biryani

  1. Preheat oven to 350F 
  2. Cover the assembled biryani tightly with a double layer of foil and start heating it up on the stove.
  3. When it’s warmed through, put the lid of the Dutch oven back on and then transfer it to the oven.
  4. Bake in the oven for 45 mins. 
  5. Once out, let it cool for 10-15 mins before you open it up. 
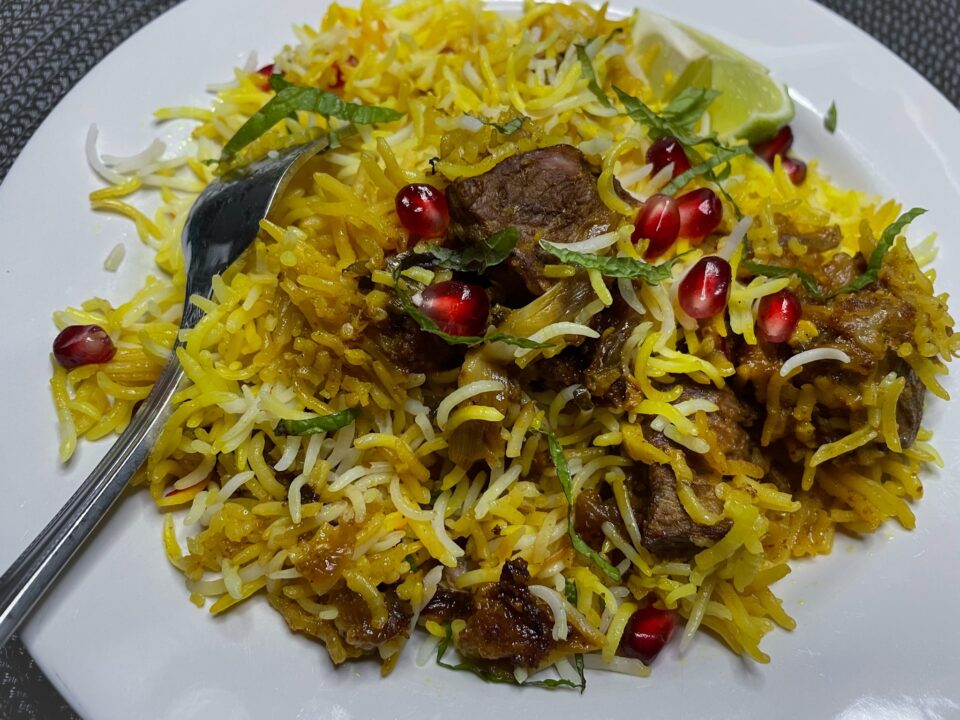
  6. Serve the biryani, by scooping it up all the way to the bottom to be sure to get to all the delicious layers.
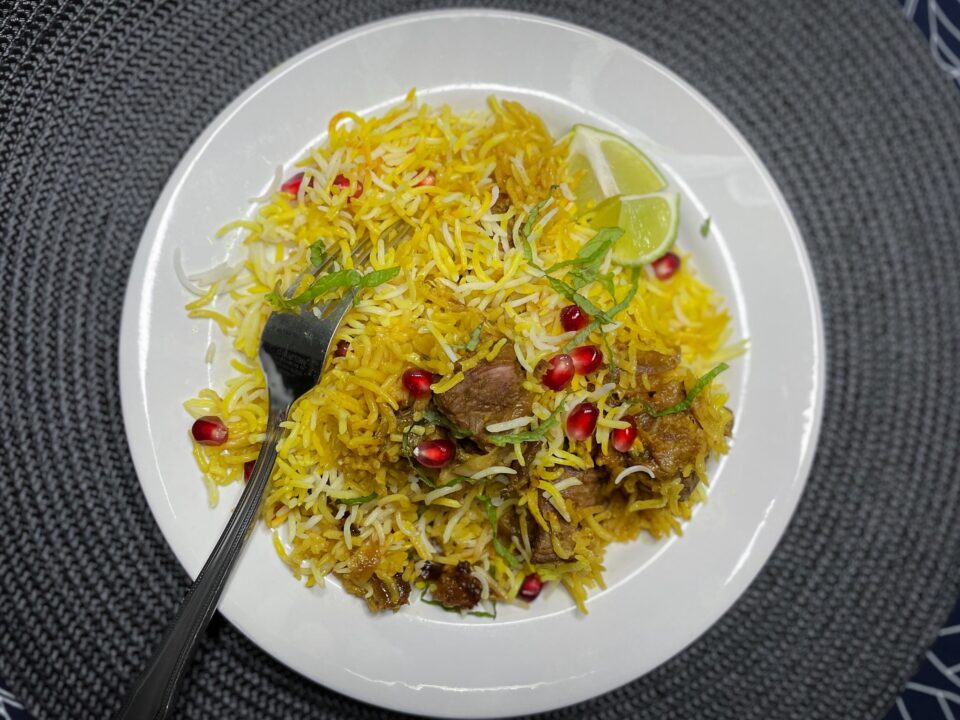
  7. Garnish with pomegranate seeds or more mint, and lime wedges.

Enjoy! You can serve the Biryani with a side of the reserved warmed sauce or a yogurt sauce like tzatziki or raita.

Filed Under: Meals Tagged With: awadhi, basmati rice, Biryani, indian food, indian rice, Indian rice dish, lamb, lamb biryani, lucknowi, rice

Fish Molee Curry

December 1, 2020 by Vish Leave a Comment

Delicious with any firm white fish. This is a version of fish curry made in Kerala, a southern state of India. It’s a simple recipe but elegant and tasty recipe that you can enjoy with a side of rice or naan.

Key Tips

  • For this recipe, we will pan fry the fish on it’s own first and then add it to the molee curry. You could directly add the raw fish into the curry and cook the fish in the curry sauce as well. But the fish tends to break apart while cooking. Pan frying the fish first, then adding it to the curry works better if you are using a delicate white fish. Moreover the slightly browned crust adds a nice touch to the finished recipe.
  • I do use Indian curry spices in this recipe, so a quick trip to the Indian store or local grocery story that carries spices may do. But these species are what you’ll use in multiple different Indian, African or maybe in Mexican recipes, so worth stocking up your pantry with these.
  • Be sure to shake the can of coconut milk before you use it. Canned coconut milk always separates into 2 layers at room temp, solid coconut cream at the top and the liquid water at the bottom.

How to prepare the Fish?

Any firm white fish would work well. For this recipe I have used Cod, but you can use pollock, halibut, etc. Tilapia will fall apart, if using, pan fry it and then add it to the sauce at the very end.

Ingredients for the Fish:

  • 1 Lb firm white fish like cod pieces
  • 2 tbs Lemon Juice
  • Salt, Pepper to taste
  • 1/2 tsp Turmeric
  • 2tbsp Olive oil

Method used to cook the Fish

  1. Cut up the fish into the size you’d like, I’d recommend 2 inch pieces. If the fish you are using is smaller size fillets, you may leave them whole as a fillet.
  2. Sprinkle the pieces of fish with the lemon juice, salt, pepper and turmeric.
  3. Let the fish marinate for 15-20mins.
  4. After that, heat up a couple tablespoons of olive oil in a pan. Turn the heat to medium, add the fish when hot and cook until the fish is browned on both sides and cooked through.
  5. Take the fish out of the pan and let it sit in a plate when you are cooking the Molee sauce.

How to make the Molee sauce?

The coconut milk here works really well with the fish. The spices are mild, you may completely avoid the Jalapenos if you do not like the heat or use just 1 for the flavor and a tiny bit of heat. It’s important that you cook the sauce at a simmer. If you like the sauce creamy and thick, you can avoid the broth. This might be a good idea if you are serving this with Naan instead of rice. With rice, I like a little lighter sauce so I add some broth. I always use full fat coconut cream and dilute it with broth rather than getting a low fat coconut milk.

Ingredients for the Fish:

  • 1 large yellow onion thinly sliced
  • 2 tbsp of olive oil
  • 1tbsp mustard seeds (optional)
  • 1-2 Jalapeno chillies thinly sliced, seeds removed
  • 6-7 cloves garlic finely chopped
  • 1 tbsp of grated ginger
  • 4 cloves
  • 1 tsp turmeric
  • 1 tsp ground cumin
  • 1tsp ground coriander
  • 1cup chicken or vegetable broth
  • 15 oz can of coconut milk
  • 6-7 curry leaves
  • 1/2 tsp salt

Method to make the Molee sauce:

Here is the method to make the sauce:

  1. In a large deep frying pan, heat the olive oil. When hot, add the mustard seeds and let it sputter. They’ll start to jump when this happens.
  2. Add the onions and turn the heat to medium. Cook until the onion has softened and looks translucent about 5-6 mins.
  3. Add the garlic, ginger and sliced jalapenos and cook for another 2-3 mins.
  4. Add the turmeric, ground cumin, ground coriander and the cloves and fry with the onion mixture for 2 minutes.
  5. Stir in the can of coconut milk, broth, the curry leaves and salt and bring it to a simmer. Do not bring it to a boil, always cook the coconut milk at a simmer.
  6. Simmer this sauce for 15-20 mins. Adjust the salt as needed.
  7. Add the fish into the sauce and cook until it’s heated through, should only take couple mins.
  8. Stir in the finely chopped fresh cilantro leaves if using.

Serve with Rice or Roti or Naan. Enjoy!

Filed Under: Meals Tagged With: coconut curry, cod, fish, fish curry, fish molee, indian fish, kerala, kerala fish molee, molee

Seafood Green Curry

November 24, 2020 by Vish Leave a Comment

This is a slightly milder form of Thai green curry that works great with seafood. You could use a store bought curry paste but after making a homemade version, you wouldn’t go back to buying a curry paste from the store. It takes some effort to gather all the right ingredients but it is worth the effort. I usually tend to make curry pastes in big batches, you can jar or freeze the paste. Use it for the next few months until it’s time to visit the Asian grocery store again.

Homemade Green curry paste vs Store Bought

The advantage is the customization. With homemade you have the control to modify the quantity of each ingredient and spice level. The heat in green curry is from Thai green chilies and you can decide how many of these you want to add to the paste.  The other advantage is the use of fresh herbs and spices  in green curry makes a huge difference in boosting the flavors in the curry.

What makes Green Curry Green?

Green curry has been my favorite of all types of Thai Curries. The Thai word for it Kaeng khiao wan, Kaeng meaning curry and Khiao wan meaning green. So what makes it green? It’s all the fresh herbs that go in it. The freshness and mild, but beautiful flavors of the fresh herbs pairs perfectly with fish, oysters, clams, shrimp. 

How to make the Green Curry Paste?

It is the simplest curry paste to make from scratch and you will find most of these ingredients in any Asian grocery market or even in stores like Whole Foods. 

Once you have all of these ingredients, getting them ready to go into the processor and turning it into a paste takes only a few minutes and the benefits of the fresh paste are worth it. 

Ingredients for the Green Curry Paste

  • 6 Spring Onions
  • 6-7 Fresh Cilantro Stems coarsely chopped (Optional)
  • 8 Kaffir Lime leaves shredded
  • 1-3 Thai green Chilies (if you like the heat), if not Serrano works too
  • 4 lemongrass stalks (bottom tender portion only), coarsely chopped
  • 1 inch piece of Galanga, skin peeled and coarsely chopped
  • 2 inch piece of ginger, skin peeled and coarsely chopped
  • 10-12 of fresh Thai Basil leaves
  • 4-tbsp of vegetable oil 
  • 1tbsp salt

Put all of these into a food processor and blend until you get a smooth paste. You may need to add 1-2 tbsp of water or additional oil if you prefer to get to the smooth texture.

You can use the paste right away to make the curry or you can put it in a jar, refrigerate or freeze the paste until you are ready to use it. With the amount here I can make this seafood curry recipe at least 2 -3 times, depending on the concentration of flavors you like in your curry. 

How do you make Seafood Green Curry?

You can use just fish, if you prefer. A light fish like Cod or Barramundi works well. My favorite curry is a seafood mix including fish, shrimp, scallops, mussels, squid rings. The creaminess of the coconut milk and the flavors of the fresh herbs pairs really well with any seafood. 

For the curry you will need,

Ingredients:

  • 2.5lbs bag of mixed seafood (shrimp, mussels, scallops and calamari). I get this from Costco. If not, just any such combination will do. 
  • 2 small fillets of Cod, cut into 2 inch pieces
  • 4-5 kaffir lime leaves, shredded, or cut into thin strips.
  • 2-3 fresh Thai or Serrano chilies, seeded and cut into strips (optional for additional heat)
  • 2 cans of coconut milk
  • Handful of torn Thai Basil leaves
  • 2-3tbsp of Thai fish sauce
  • 3-4 green parts of the Spring Onions for garnish, minced
  • Squeeze of lime juice

Key Tips – 

  • If you not into Thai Fish Sauce (yes, it is super stinky, but adds a delicious flavor), you can use soy sauce.
  • For coconut milk, I prefer the full fat coconut milk with seafood. For chicken, a little less creamy works better. You can use one can of full fat coconut with 1 can of reduced fat coconut milk.
  • You do not want to overcook the curry sauce, coconut milk can get slimy as it overcooks. I split up the additions of coconut milk to avoid this.  Avoid bringing coconut milk to a boil, should always stay in a state of mild simmer.
  • While cutting up Kaffir Lime leaves, take out the central vein, it is tough and will not taste good in the curry. To cut up Kaffir lime, roll up a few after taking the central vein out and cut it into very fine strips.
  • While using Lemongrass, only use the bottom 1-2 inches that are tender. Take out the most of the tough layers until you get to the tender part of the stalk. Remove the tough base as well. 
  • It’s important not to overcook the squid, it will turn chewy. As soon as shrimp gets slightly pink, you can stop.  It shouldn’t take more than a few mins if there is no liquid. If the seafood is frozen, completely thaw it out and strain all liquid before stir frying. Also if the wok isn’t large enough, cook the seafood in installments. If you overcrowd the wok, the seafood will steam, release water and overcook. 

Method to make the curry

  1. In a large wok, heat up some oil. When hot add the seafood mix and cook until the shrimp turns just pink. If using mussels either use cooked mussels or cook it separately until mussels open up and are cooked.
  2. Transfer the cooked seafood onto a plate while you are making the curry sauce.
  3. Add 1 can of coconut milk to the same wok and add 1/4 to 1/3rd cup of the paste, the fish sauce and shredded kaffir lime leaves to the hot coconut milk and stir well to mix. You can use close to half of the paste that you made. 
  4. Bring this mix to a simmer, then reduce heat to maintain simmering gently for 10 mins
  5. Add the 2nd can of coconut milk to the wok and stir and continue to cook until it is heated through and comes up to simmer. This should take a couple mins. 
  6. Add the chunks of fish to the sauce 1st, and after a couple minutes or so add the cooked seafood. 
  7. Adjust seasoning. Cook until the seafood is heated through, a few more mins, not more. You do not want to overcook the seafood.
  8. When heated through, add in the green chilies (if using), scallions and torn basil leaves.
  9. Serve with freshly cooked hot Thai Jasmine rice and couple lime wedges on the side. Squeeze of lime into the curry just before you eat. 

You may substitute seafood for chicken or tofu if you prefer. When I use seafood, I do not use any other vegetables. But if you are using chicken, you could add other vegetables like eggplant or peas. You can use thinly sliced chicken or precooked chicken breasts to the curry sauce. The other option with chicken is to marinate the chicken in some curry paste and soy sauce, stir fry the chicken prior to adding it to the curry sauce. Enjoy!

Filed Under: Meals Tagged With: curry, fish curry, green curry, seafood, seafood curry, thai, thai curry

Clams in White Wine Sauce

November 5, 2020 by Vish Leave a Comment

Clams are perfect when gently cooked in white wine. Fast and easy to do and super tasty. You can also do the same with Mussels and the same recipe works great. What I enjoy the most is dipping a piece of rustic bread like a baguette into the warm clam, lemon and wine sauce, generates a burst of flavor in your mouth. Be sure to have this with the wine you use to cook the clams.

Clams cooked in Wine

Very popular in Belgium and France served as Moules et Frite (Mussels with Fries) and in Italy the clams with the wine sauce are served on spaghetti.  I ate this for the first time in Bruges, Belgium and fell for it and have been making it ever since I got back home. 

Moules- Frites at Poules Moules Restaurant in Bruges, Belgium

Key Tips

  1. Use a good wine! Use the one you want to drink with this dish. I would recommend a zesty acidic wine like a Sauvignon Blanc, Pinot Grigio with this one. 
  2. Clean the Clams or Mussels thoroughly otherwise you’ll end up with them spitting out the sand in your delicious sauce

Cleaning the Clams

After this I move the clams one by one into another container of fresh water, discarding the broken or open fellas out. Test by tapping on the clams. If alive it will close. The open and cracked clams are dead, toss these out. Let it sit another 10-15 mins to get rid of the saltiness from the salt water and any remaining sand.

Dump all the clams in a large pot of water with a couple of tablespoons of sea salt. Let the clams sit in it for about 30 mins. The clams will relax and start slowing opening a little and they will spit out any sand inside. This step is important as if you don’t do this, you will likely end up with sand in your sauce.

Clams spit out sand when in salt water

If you are using Mussels:  In addition to the steps above it is important and you pick them out one by one to pull out the beard of the mussels. I’d highly recommend wearing a pair of rubber cleaning gloves, these strands are sharp and I have ended up with cuts on my fingers many times! 

Components of the Clams in White Wine Sauce

Clams cook really fast, so be sure you have all of these next to you on the counter before you begin. You will need the following:

  • Clams about 3lbs, 30-32 in count
  • 3 cups Dry White Wine, Good quality Sauvignon Blanc or Pinot Grigio
  • Shallots, 2 tbsp very finely chopped
  • 3-4 cloves of garlic, smashed & then finely chopped
  • 1 lemon
  • 2-3 tbsp of finely chopped Parsley

Steps to make Clams in White Wine Sauce

Clams cooking in white wine, garlic and lemon
  1. Clean the clams or mussels following the cleaning method described above.
  2. In a large sauté pan, big enough to hold all the clams, sauté the finely chopped shallots in 2 tbsp. of butter until translucent. You do not want it to brown. It should take about 3-4 mins.
  3. Add the finely chopped garlic and fry for 1-2 mins
  4. Add the 3 cups of the wine to the pan. Simmer until the wine reduces in half.
  5. Season with salt and pepper
  6. Cut the lemon into quarters and add 2 of them to the pan.
  7. Add the cleaned clams to the pan. Cover and cook for 3-4 mins.
  8. Within a couple of minutes the clams will start opening up. Wait for all of them to open up. 
  9. The clams will release their juice into the pan, which combined with the wine will make a tasty sauce. Simmer the juices for a couple more mins without the lid.
  10. Sprinkle fine chopped parsley to the pan and it’s ready. If you like a bit of heat, you can add a pinch or 2 of red pepper flakes to it at this time.

Serve it with a rustic baguette and the remaining 2 quarters of lemon. Be sure to dip the baguette into the sauce and enjoy!

Clams in white wine, served with warm baguette

Filed Under: Meals Tagged With: Clams, clams in white wine, Clams in white wine sauce, Clams in wine, moules, moules frites, mussels, mussels in wine

Lemon Olive Oil Bundt Cake

April 4, 2020 by Vish Leave a Comment

If you like pound cake and lemon, nothing better than this cake. Easy to make and the olive oil adds a nice flavor and density to the cake….

Read More »

Filed Under: Desserts Tagged With: bundt, bundt cake, Cake, greek yogurt, lemon, lemon bundt, Lemon cake, moist cake, olive oil, pound cake

Light & Moist Cinnamon Rolls

March 29, 2020 by Vish Leave a Comment

This recipe is a hit every single time I have made it..The rich but very delicate and light dough is what amazes everyone as they take a bite of this goodness.

What makes this recipe work?

The smaller size rolls are always tasty. The texture is not as dense as you will find in a store or bakery. You can easily gobble up a couple in one go. The filling is just perfect, the caramelized brown sugar on the inside makes a world of difference compared to using white granulated sugar. I prefer using the light brown sugar, so you can still maintain the light color of the dough and yet achieve the caramelized flavor.

Cinnamon always works great in the filling, but occasionally I would substitute it with Cardamon. The icing on the top, you can completely skip it, trust me, it will still be as good. But a light cream cheese icing drizzle on to the top, just kicks it up a notch. When using cardamon, I’d drizzle some good quality honey instead on these little rolls of happiness.

You can add pecans pieces to the center with the cinnamon and brown sugar which is my favorite version! 

KEY TIPS:

  1. For the Dough, always assure all the ingredients are at room temperature. Move the eggs, butter and milk from the refrigerator to the kitchen counter roughly 6 hours before we begin. If I am making these early in the morning, I’d put those out on the counter before I go to bed.
  2. Make sure you weigh both the wet and dry instead of measuring them. Use a good quality weight scale to accurately weigh all the ingredients. In the world of bread and pastry making, this makes a big difference.  Use the measurements below only as reference. I have included the weight for each ingredient.
  3. Use Instant yeast instead of Active dry yeast. It is also know as Rapid Rise, Fast Rising, Quick Rise yeast. This is very different from the regular Active Dry yeast.
  4. After spreading the filling and rolling the dough into a cylinder, assure that the cylinder is uniform in size. It is very easy to have edges to be smaller and center to be bigger. Adjust the cylinder so each cinnamon roll when cut is the same size. This will make sure they are all cooked evenly and will not dry up one of the smaller ones in the oven.

How to achieve the perfect rise?

Note: Be sure to measure all of these ingredients by weight. This is the single most important step for the dough to rise perfectly and create the soft and light texture we are after.

  • 4 1/2 cups (21 1/4 ounces) All Purpose Flour
  • 1/2 cup Cornstarch (2 ounces)
  • 2 1/4 Tsp instant or rapid rise yeast
  • 1 1/2 Tsp salt
  • 3/4 cup (6 ounces) whole milk, at room temperature
  • 1/2 cup (3 1/2 ounces) granulated sugar
  • 12 Tbs (6 ounces) unsalted butter, softened
  1. Whisk the flour, yeast, cornstarch and salt together in a bowl of a stand mixer.
  2. Whisk the eggs, milk and sugar until the sugar has completely dissolved.
  3. Using the dough hook of the mixture at very low speed combine the milk mixture to the flour mix until no flour remains at the bottom of the mixture. You may have to scrape the edges to combine them. The dough will be quite sticky at this time.
  4. Turn the mixer up to a medium speed, use the same dough hook attachment. Add the butter 1 Tablespoon at a time. Wait for the 1st tablespoon to get incorporated before adding the 2nd. Knead until all the butter is incorporated about 8 to 10 minutes. Then continue to knead until the dough is smooth and elastic and easily clears off the sides of the bowl.
  5. Transfer this is to a lightly floured surface and knead by hand for a couple more minutes. Form a round smooth ball and place the dough seem side down, smooth side up in a lightly greased large bowl or container. Be sure that the size of the bowl is atleast 4-5 times the size of the dough. Let it sit on the counter for the next 6-8 hours. It takes mine atleast 6-7 hours to rise to the state I like. G It would be a good idea to make the dough the night before, right before bed. It would be ready for you first thing early morning. 
  6. Line the bottom of the pan with foil. Use 2 long sheets of aluminum, 1st one 13 inch wide and the 2nd one 9 inches wide. Lay the sheets of foil perpendicular to each other in a 13×9 inch pan with extra foil hanging over the sides of the pan. The sheets should go up the sides and corners of the pan. This would assure the rolls don’t stick to the pan and can be taken out easy. Further, spray the entire foil on top with a vegetable oil spray.

How to make the Filling?

For the Filling, you’ll need:

  • 1 1/2 cups packed (10 1/2 ounces) light brown sugar
  • 1 1/2 Tbs ground cinnamon
  • 1/4 Tsp Salt
  • 1 cup of Pecan pieces if using

Using a whisk, combine to mix well.

Let’s roll it up..

You’ll need:

  • 4 Tbs (2 ounces) unsalted butter, softened

The butter should be nice and soft so it can be brushed on the rolled dough.

  1. First, deflate the dough by pressing it down. Then on a lightly floured surface, roll the dough to form an 18 inch square.
  2. Brush the softened unsalted butter to the dough evenly, leaving about ½ inch around the edges.
  3. Sprinkle the sugar mix on the butter dough, leaving the same ½ inch around the edges. Lightly press it so it adheres to the butter. Leaving the  ½ inch around the edges is important to seal the rolled cylinder in the next step.
  4. Add the pecans (if using) on top of the sugar mix, pushing them in slightly.
  5. Carefully roll the rough away from yourself, keep the roll nice and taut and make a cylinder. Pinch the seam closed at the end. Now you can adjust the and reshape this cylinder to an uniform thickness. This is important so that each cinnamon roll is the same size and will bake uniformly.
  6. Using a serrated knife, cut the cylinder into 8 -12 pieces.
  7. Place each roll, cut side down on the prepared baking pan. Cover the rolls loosely with plastic wrap and let this sit for about 2 hours until the rolls rise and fill up the pan.

Baking the Rolls

  1. Adjust rack to the middle position in the oven preheat the oven to 350F.
  2. Bake until the buns are golden brown. It should take between 35 to 45 mins. If using a convection oven, maybe done slightly earlier.
  3. Rotate the pan around half way during the baking process to get an even color and bake.
  4. Once you pull the rolls out of the oven, use a fork to give it a quick check in the center of the rolls. Although brown on the outside, if your rolls are big, the center could still be doughy.
  5. If it is bake it for a bit longer. Check every 5 mins, since you do not want your rolls to over bake and be dry.

The Glaze

  • 1 1/2 cups (6 ounces) confectioner’s sugar
  • 4 ounces cream cheese, softened
  • 1 Tbs whole milk
  • 1 Tsp vanilla bean paste or vanilla extract
  1. Whisk all of the ingredients till smooth.
  2. Be sure to check if the insides of the rolls are cooked before brushing on the glaze. You may need to put these back in the oven if centers are not fully done.
  3. Cool the rolls for about an hour before you drizzle the glaze on it. Putting the glaze on the rolls when they are warm will cause the glaze to get soaked up. 

Eat them when they are still a little warm! I promise you each time you deliver these rolls to someone, you’ll be making a new best friend. Enjoy

Filed Under: Breakfast, Desserts Tagged With: bread, breakfast, buns, cinnamom bun, cinnamon, cinnamon rolls, homemade, pecan, sticky buns

Maple Nut Granola

April 24, 2018 by Vish Leave a Comment

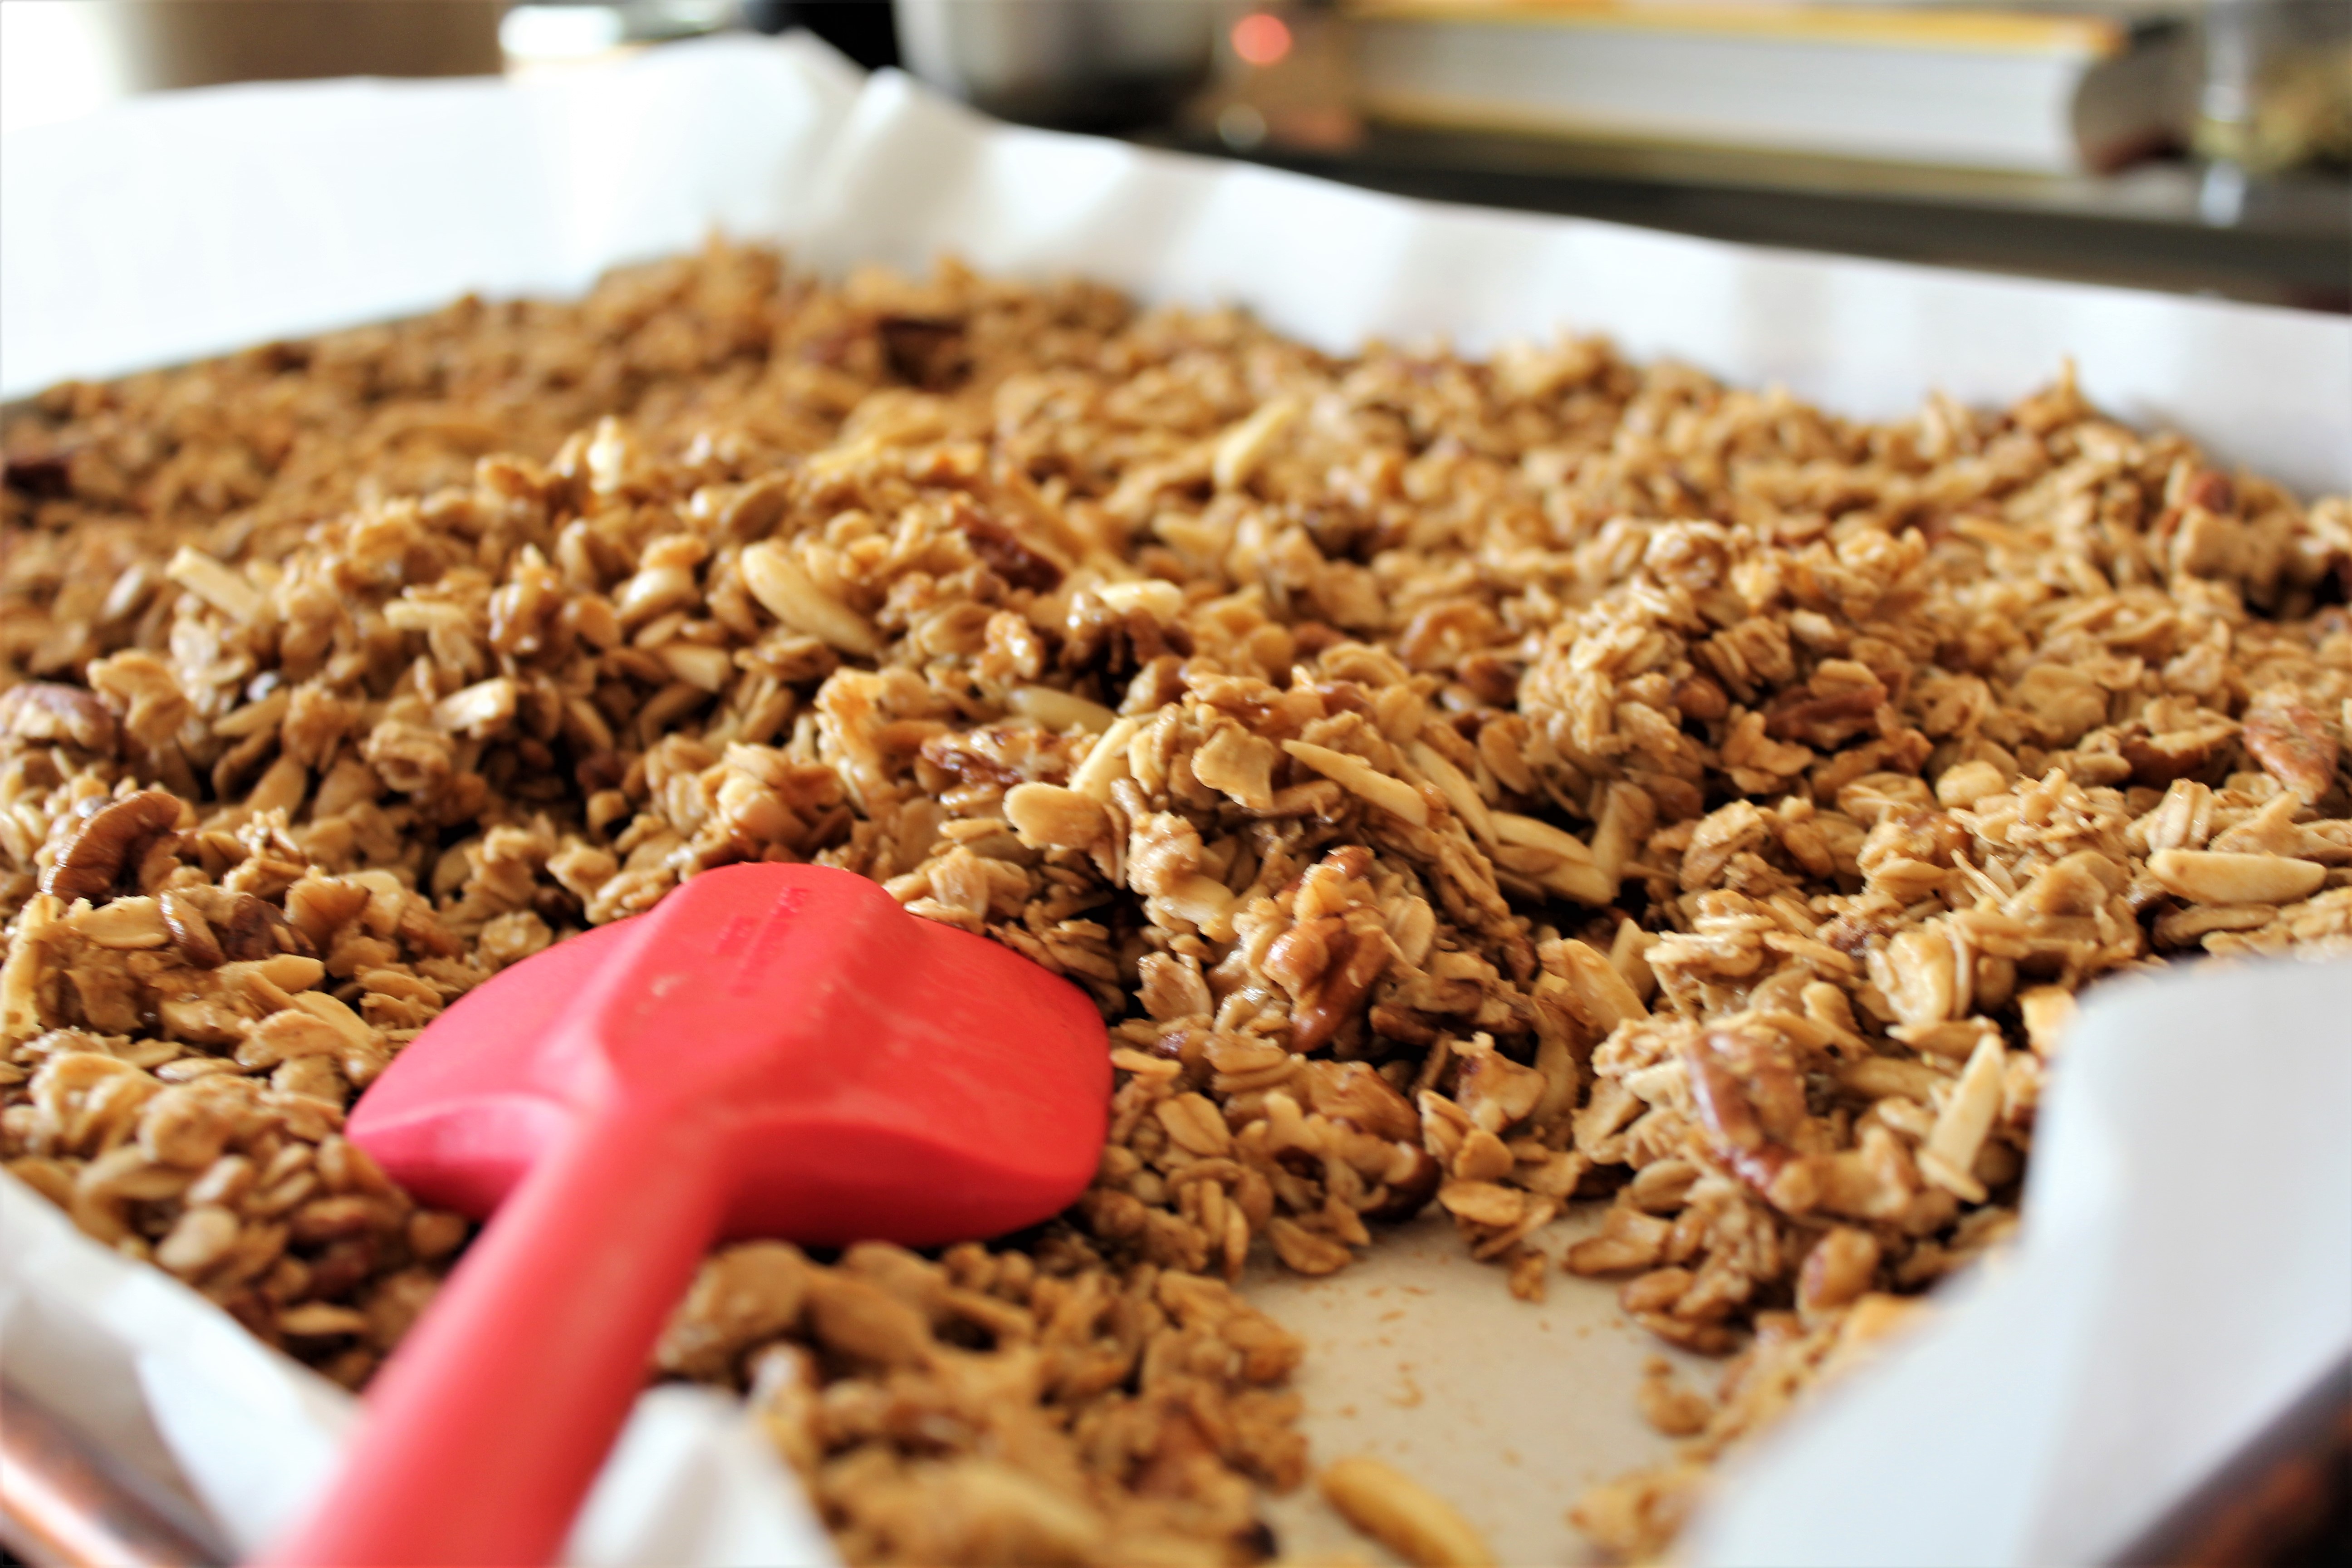
The first time I made granola at home, I couldn’t believe how simple it was to put it together.  Throw your favorite nuts, seeds, oatmeal, a bit of oil or butter and a sweetener like maple syrup or honey together for a fantastic and healthy treat.  Such a good and handy snack to have at home. You store it in an airtight container and it will last for several days. Also makes for great giveaways to neighbors or friends. Put it in a little fancy box and that makes for a really healthy gift. 

The advantage is, you choose what goes in it, have control of how sweet you like it and pick your favorite type of nuts to use.  Once you have the base ingredients, you can create your own variation. No more store bought granola for me.

What is in a basic granola?

Granola is usually has a base of old fashioned oats. With that base, you can add other dry ingredients like nuts, seeds, dried fruits, chocolate chips etc.. You can go nuts using your imagination.

  • The Sweetener – Brown sugar or Maple syrup or Honey, any of these work well. I like mixing brown sugar with maple syrup in this version.
  • The Fat – We need some fat to give it that nice crispiness. You can use canola oil, butter or even olive oil.
  • The Spices – You can use spices like Cinnamon, Cardamom, nutmeg, orange zest.. So many options.

Always add a pinch of salt, it goes a long way to bring out the flavors in the granola..Now we just mix them all up and bake.

Dry Ingredients = Rolled Oats + Nuts + Sugar + Dried fruits

Wet Ingredients = Veg oil/Butter + A Sweet Syrup (Maple Syrup/Agave/Honey etc..)

How do you make Maple Nut Granola?

The sweetness and flavor in this version is from Maple syrup and the dark Brown sugar. Together it creates a dense maple flavor to the granola.  I use many different types of nuts here, but you can pick just a couple and  double up the amounts.

Key Tips:

  • I highly recommend using the best quality maple syrup you can get your hands on.. If you can get hold of a Grade B bottle of goodness, use it.
  • For the nuts, use them as soon as your buy them. Old nuts stored away for while do taste bad. Use raw nuts as you will be roasted them with the granola.
  • For the sugar, using dark brown sugar adds a more dense molasses flavor to the granola. If not regular cane sugar or light brown sugar works well here too.
  • If you are adding dried fruits or chocolate chip, add them to the granola when backing is done.  We don’t need to bake these.

For the Dry Mix

  • 5 cups of Old fashioned Rolled Oats
  • 1 cup Walnuts
  • 1 cup Pecans
  • 1 cup Slivered Almonds
  • 1 cup Sunflower seeds
  • 3/4 cup Dark Brown Sugar
  • 1 Tsp Salt

First we mix all our dry ingredients together – oatmeal and the nuts and seeds (sunflower or pumpkin)

I use them all – 1 cup each of Walnuts, Pecans, Slivered Almonds, Sunflower Seeds together. If you choose to add Pistachios, add them on to the 2nd half of baking. Pistachios tend to roast fast and may turn brown quickly.

Mix in the nuts to the oatmeal with ¾ cup brown sugar and 1 tsp of salt.

The Wet Mix..

  • 3/4 cup Maple Syrup
  • 1/2 cup Vegetable Oil
  • 2 Tbs of Butter
  • 1/2 cup Water

For the maple syrup mix, whisk ½ cup maple syrup with ½ cup oil, 2 tbsp of butter and ½ cup of water.

Putting it together..

Preheat oven to 275F. Add the Maple Syrup Mix to the Oatmeal Nut mix and stir well. Line a baking tray with parchment and spread it evenly on a baking tray. Bake at 275F preheated oven for 45 mins.

After 45 mins, stir granola around and turn the baking tray around and then back into the oven for another 45 mins.

Adding the Dried fruits..

Once you pull our the granola from the oven, add about 1.5 to 2 cups of raisins to it. You can use dried cranberries or cherries instead of rasins if you wish to do so, but raisins go well with this recipe.

Let the granola cool completely. Store it in an airtight jar for a couple weeks, that is if it lasts that long, ha!  At home, we are usually all over it when I pull it out the oven, and get through a batch in 2 to 3 days.

Also a really awesome way to make your house smell great!

Bonus:

Mix this 1 cup of the granola with Vanilla ice cream & top if off with wild blueberries for an awesome dessert!


.

 
5 from 1 reviews
Maple Nut Granola
 
Save Print
Prep time
15 mins
Cook time
1 hour 45 mins
Total time
2 hours
 
Author: Vish's Kitchen
Recipe type: Healthy Snack
Serves: 1 baking sheet full
Ingredients
  • 5 cups Old Fashioned Oats
  • 1 cup Sunflower Seeds
  • 1 cup Slivered Almonds
  • 1 cup chopped walnuts
  • 1 cup chopped pecans
  • (or 1 cup pistachios)
  • ½ cup Brown Sugar
  • ½ cup Water
  • ½ cup Canola oil
  • ¾ cup Maple Syrup
  • 1½ cups Raisins
Instructions
  1. Preheat oven 275F
  2. Mix all the dry ingredients together, except for the pistachios if using and the raisins.
  3. Whisk together water, canola oil and maple syrup
  4. Add the wet mixture to the dry ingredients
  5. Spread on a cookie sheet
  6. Place in the oven for 45 mins
  7. Remove, mix it well and bake again for another 45 mins. If using Pistachios add them in at this time.
  8. Remove and add the Raisins
  9. Cool and store in airtight container.
3.5.3226


Filed Under: Meals Tagged With: Christmas, Christmas snacks, granola, healthy breakfast, healthy snack, maple syrup, nuts, pumpkin seeds, raisins

Dark Chocolate Brownies

May 16, 2017 by Vish Leave a Comment

Now who doesn’t enjoy a nice warm brownie with large scoop of vanilla ice cream on top. This recipe a dark chocolate lover’s dream come true. You can use as dark of a chocolate as you desire. For me the 63-75% dark is perfect..

For the chocolate, my favorite chocolate of choice is 63% Extra Dark Guittard chocolate mixed with Semisweet Guittard chocolate chips. Key to a good tasting brownie is in the chocolate used..all the flavor comes from chocolate, so use your favorite good quality chocolate for the recipe.

Some brownie recipes do include walnuts, but this recipe is pure chocolate all the way. Interesting ingredient you’ll find in most brownie recipes is instant coffee powder or espresso. For this recipe, I have used 2tbs of espresso. You may substitute with 1tbs of instant coffee instead. Coffee is used to enhance and boost the chocolate flavor in a the brownie, you will not taste the coffee.

Firstly, we need to melt the chocolate and butter in a double boiler. Why the double boiler? It is because, chocolate can burn quite easy. Melting it in a double boiler assures that chocolate melts gently and no direct contact will heat will prevent the burning. For a homemade double boiler (also quite often referred to as water bath or bain marie), place a glass bowl on top of a saucepan containing water and then bring the water to a boil. Keep the water at a boil on medium heat during the entire process. When the butter and chocolate are well combined you will get a silky smooth look to the melted chocolate that looks like a ganache..

Set this aside, while we get the egg mixture ready. In a bowl of a stand mixer, add the 6 eggs, 1 tbs vanilla, 2 tbs of cooled espresso and the 1½ cup sugar. Beat until well combined.

While the eggs are getting happy in the mixer, time to get the dry ingredients together. In a Sifter, sift the 1¼ all-purpose flour, the 1tbs baking powder and ½ tsp salt. If you don’t have a sifter, don’t sweat it, combine all the dry ingredients in a bowl and whisk away. The goal here with the sifting is to make sure your flour is well aerated before you bake. A balloon whisk should do the job as well.

Once the eggs are combined, add the melted chocolate mixture into it and mix well. You can now add the dry ingredient ½ a cup at a time with the mixer running at a low speed. Here you want to mix just until the flour is incorporated into the chocolate egg mix.

In a bowl mix about ½ to 1 cup of the extra dark chocolate chip with 2 tbs of flour. Add it to the chocolate mix and fold it in or if using a mixer just a few rounds should do..Coating the chocolate chips in flour will prevent all the chocolate chips from sinking to the bottom of the pan, they will remain floating in brownie through the baking process.

Bake the brownies at 350 for about 30 mins. Tapping the baking sheet a few time while baking will let the air out to get a more dense brownie.Do not overbake, this is important, it will dry up the brownies. Check the brownie after about 25mins with a wooden skewer, as soon as it come out clean, time to take it out.

If you do like chewy fudgy brownies, here a trick..While brownies are cooking, time to clean out the freezer, why? What has the freezer to do with my brownies you say? Well, this is to make some room for the baking sheet in the freezer. Once the brownies are done, take them straight from the oven to the freezer to cool. The concept is quite simple, when you boil veggies, as soon as it’s done, it’s dunked in ice water to stop further cooking. The brownies do the same, if you let it sit at room temp, it will continue to cook inside leading to some cakiness. If you desire the chewy fudgy brownie, then we want to cool it as fast as possible.

Cut the brownies after cooling it well.. If you cut it while still warm, it will crumble up. I like to use my trusty pizza slicer for cutting up the brownie but a large sharp knife will do the job well as well.  Brownies usually takes better the next day after you bake, the chocolate sets up well resulting in further goodness.

How do you best like your brownies? Leave me a comment! For me it just has to be slightly warmed up with a big scoop of vanilla bean gelato (my favorite brand Talenti), gently melting away on top of that warm brownie.


5 from 1 reviews
Dark Chocolate Brownies
 
Save Print
Prep time
20 mins
Cook time
30 mins
Total time
50 mins
 
Recipe type: Dessert
Serves: 24
Ingredients
  • 3 Sticks of Butter
  • 11.5oz Semisweet Chocolate Chips (Guittard Chocolate Chips preferred)
  • 11.5oz + 1 cup Extra Dark Chocolate Chips (Guittard Chocolate Chips preferred)
  • 6 Eggs
  • 1 Tbsp Vanilla Extract
  • 2 Tbsp Espresso
  • 1½ cups Sugar
  • 1¼ cup All Purpose Flour
  • 1 Tbsp Baking Powder
  • ½ Tsp salt
Instructions
  1. Preheat oven to 350F
  2. Line 12 x 18 x 1-inch baking sheet with parchment and grease with butter.
  3. Add the 3 cups of butter in a glass bowl to place on top of a double boiler.
  4. Once the butter starts to melt, add all the chocolate chips to the bowl
  5. Using a spatula, stir the butter and chocolate chips until the chocolate chips melt
  6. Set the melted chocolate on the side to cool.
  7. In a mixer, mix the 6 eggs, the 1Tbsp vanilla extract, 2 Tbsp of coffee and the 1½ cups of sugar.
  8. In a sifter, sift the the 1¼ cup of All Purpose Flour, 1 Tbsp Baking Powder and the ½ Tsp salt.
  9. Toss the 1 cup of extra dark chocolate chips with 2 Tbsp of flour and set aside
  10. Once the egg is well mixed, add melted chocolate and mix well.
  11. Then add the flour mixture and mix until just combined.
  12. Lastly add the 1 cup of chocolate chips tossed in flour to the mix. Fold it in with a spatula or mix just enough to incorporate into the mix
  13. Pour the entire chocolate mix into a baking sheet lined with parchment
  14. Bake at 350F for 30 to 35 min until a toothpick inserted comes out clean.
  15. Tapping the baking sheet a few time while baking will let the air out to get a more dense brownie.
  16. Put the baking sheet into the freezer as it comes out of the oven for a hour or 2 to cool it down to get a more chewy texture in the brownie.
  17. Cut to desired size squares and enjoy!
3.5.3226


Filed Under: Desserts Tagged With: brownie, chewy, chocolate, chocolate brownie, chocolate dessert, dark chocolate, Desserts, fudge, guittard, Guittard chocolate, Guittard chocolate chips

Thai Yellow Curry

February 14, 2017 by Vish 4 Comments

One of the things I am a real sucker for a rich and creamy Thai curry. The freshness of the herbs and spices used in Thai curries always intrigue me.. The first few times I made Thai curries at home, I went over to my local Asian market and grabbed a jar of curry paste. It turned out good but the heat in the curries, made with the store bought Thai curry paste was too much for my family.. It was just too spicy. That’s when I decided to do this myself, and now I am hooked!! My freezer is well stocked with all our favorite curry pastes..

…

Read More »

Filed Under: Meals Tagged With: Comfort Food, curry, curry powder, ginger, Kaeng Kari, lemongrass, red curry, rice and curry, thai, thai yellow curry, that curry, turmeric, yellow curry

Quick and Easy Pizza Crust

January 25, 2017 by Vish 5 Comments

Do you just ever crave a quick and instant pizza? And you don’t have time to go to the store and buy a pizza crust? Well, this quick and easy made from scratch pizza crust from your pantry will surely amaze you! The first time I made it, I couldn’t believe how tasty it turned out, and all you need is 3 staple ingredients from your kitchen..

  1. Self-Rising Flour
  2. Greek Yogurt
  3. Olive oil

Equipment:

  • Rolling Pin
  • Mixing Bowl
  • Baking Mat or a clean surface to roll your dough

Tips & Tricks:

  1. You may need to adjust the proportion each of the ingredients slightly as the consistency of the Greek Yogurt varies from brand to brand. I have used the Costco’s Kirkland Signature Organic Non-Fat Greek Yogurt for this recipe..
  2. Best to roll the crust on a large silicone baking mat, you are always guaranteed a stick free rolling with it..

Ingredients (Makes Two 14-15 inch Pizzas)

  • 3 Cups Self-Rising Flour
  • 2 cups to 2.5 cups Greek Yogurt
  • 4 Tbsp Extra Virgin Olive Oil

Method:

  1. Add the 3 Cups Self-Rising Flour, 2 cups of Greek Yogurt and the 4 Tbsp Olive Oil to a mixing bowl.

2. Get in there with your hands and mix to form a dough. You may need to add either more flour or yogurt to form dough.

3. Knead the dough with your hand until it feels pliable and can be easily rolled with a rolling pin.

4. Cut the dough in half and let it sit for 10 mins.

5. Roll each half of the dough to fit your pizza pan or you can also roll it to fit your baking tray if you are making a flatbread..

6. Brush the pizza crust with olive oil and top with your favorite ingredients..

This is a quick and easy meals for kids or play dates. One of my tricks is to roll the pizza crust to a large size and then give the kids each a cookie cutter so they get to decide their pizza shapes. Put out a few toppings and let them have a go at making their own pizzas! They absolutely enjoy this and guess what, how could anyone not eat a pizza the shape of a Christmas tree or Snow flake or Mickey mouse :)!


Filed Under: Meals Tagged With: crust, easy pizza crust, easy pizza recipe, kids, kids meal, Pizza, self rising flour, yogurt

  • Go to page 1
  • Go to page 2
  • Go to Next Page »

Primary Sidebar

About Me

Hi there! I am Laxmi! I am an engineer with a passion for food and culture..There is nothing more I enjoy then creating that perfect recipe.. I am so thrilled to share my passion for food with you in this blog! Read More…

Footer

Copyright © 2026 · Foodie Pro Theme by Shay Bocks · Built on the Genesis Framework · Powered by WordPress